To capture sharp, smooth slow-motion footage of a bird flying, you need a camera that shoots at least 120 frames per second, a shutter speed roughly double your frame rate (so around 1/250s at 120fps), continuous autofocus with bird or animal subject recognition enabled, and a long telephoto lens. Get those four things right and you'll start pulling usable clips on your first session. Everything else, including lighting choices, post-processing, and understanding what you're actually seeing in the footage, builds on that foundation.
Slow Mo Bird Flying: Step by Step Guide to Capture Flight
Marcus Chen
19 May 2026
Capture vs. interpret: what "slow mo bird flying" really means
When most people search for slow motion bird flying, they want one of two things: they either want to shoot it themselves, or they want to understand what they're looking at in footage they've already found. This guide covers both. Capturing slow motion is a technical act, a matter of frame rates, sensor speed, and tracking algorithms. Interpreting it is a biological one. A wingbeat that looks like a single blur at normal speed reveals two completely distinct mechanical phases in slow motion: the downstroke, which generates most of the lift, and the upstroke, which in many species contributes surprisingly meaningful forward thrust. Knowing that before you press record changes what you choose to film and how you frame it.
It's also worth separating this from a related but different topic: footage of birds appearing to hover or freeze mid-air, which is more about specific species behavior (kestrels, hummingbirds, kingfishers) than frame rate. Slow motion reveals the mechanics behind that apparent stillness. The slow motion itself is a tool for seeing what normal playback hides.
Gear and settings: fps, shutter speed, ISO, and resolution
Frame rate is the starting point. At 60fps slowed to half speed in a 30fps timeline, wing motion still looks fairly natural. At 120fps you start seeing real detail in the wingbeat cycle. At 240fps and above, you can watch individual primary feathers separate and flex. Most modern mirrorless cameras (Sony A9 III, Canon EOS R5 Mark II, Nikon Z9) shoot 4K at 120fps or higher in crop mode. If you're on a smartphone, many recent flagship phones offer 240fps at 1080p, which is genuinely useful for close-range birds like pigeons or ducks on a pond.
Shutter speed follows the 180-degree shutter rule: set it to approximately double your frame rate. At 120fps, that's 1/250s. At 240fps, use 1/500s. This gives you natural-looking motion blur between frames rather than the strobing, hyper-sharp look you get at faster shutters. For birds specifically, some photographers push to 1/1000s even at 120fps to freeze individual feathers more crisply, but that trades smoothness for sharpness. For birds specifically, the guide also suggests using faster shutter speeds such as 1/2500 s to freeze fast wing and flying moments at high frame rates blank" rel="noopener noreferrer">push to 1/1000s. Try both and see which result you prefer for your subject.
High frame rates are light-hungry. At 120fps you're typically losing two or more stops of exposure compared to standard video, which forces ISO up. On modern bodies with good noise performance, ISO 3200 to 6400 is workable. On the Nikon Z9, you can set a maximum ISO cap in the video menu under ISO sensitivity settings so the camera doesn't auto-push beyond a point where noise wrecks your detail. On Sony bodies, keeping ISO at or below the camera's native value (often ISO 12800 on the A9 III) preserves cleaner shadow detail in feathers.
| Frame Rate | Recommended Shutter Speed | Slow-Down Factor (24fps timeline) | Best For |
|---|---|---|---|
| 60fps | 1/125s | 0.4x | Large soaring birds, gentle glides |
| 120fps | 1/250s | 0.2x | Medium birds, flapping flight |
| 240fps | 1/500s | 0.1x | Fast wingbeats, takeoff/landing |
| 480fps+ | 1/1000s | 0.05x | Hummingbirds, fast diving raptors |
Resolution matters because birds in flight almost always require cropping in post. Shooting 4K at high frame rate gives you room to punch in 50 to 70 percent without the result looking soft at 1080p output. Some cameras drop to 1080p at their highest frame rates, which limits that flexibility. Know your camera's specific crop factor at each frame rate before you go out.
Keeping the bird sharp: focus, tracking, and framing
Autofocus tracking has improved dramatically, and bird-specific subject recognition is now standard on Sony, Canon, and Nikon flagships. On Sony bodies like the A9 III, set your Image Recognition Target to Animal/Bird and enable Image Subject Recognition in AF, then pair that with a Tracking: Wide focus area. The camera will find and lock onto a bird's eye and hold it through the frame even as the bird banks or accelerates. On Canon bodies (EOS R5 Mark II and similar), navigate to the Subject to Detect menu and select Animal/Bird, then use Whole Area Tracking Servo AF so the camera doesn't lose the subject when it moves toward a frame edge.
Bird eye detection can fail, and it helps to know when. Canon's own documentation notes that face and eye detection struggles when the bird is too small in the frame, camouflaged against a complex background (a hawk against a tree canopy, for instance), or moving at an angle where the eye isn't visible. In those situations, the camera may lock onto the body or the wing instead. If you notice focus hunting on a Canon R5 Mark II, try raising the tracking sensitivity and acceleration/deceleration tracking settings, or switch the Case characteristics to Responsive +1 to make the AF react more aggressively to sudden directional changes.
Always use Continuous AF (AF-C) rather than single-shot AF for moving birds. Single-shot locks focus at the moment you half-press and holds it, which is fine for a perched bird but useless the moment it launches. With AF-C running and bird recognition active, you can hold half-press and pan with the subject while the camera continuously recalculates focus distance.
Framing in slow motion requires leaving more space in the frame than you think you need. A bird moving at 30 mph can cross your frame in under a second even at 120fps. Give the bird leading room in the direction it's flying, roughly two thirds of the frame ahead of it and one third behind. This also gives you flexibility to reframe in post without losing the bird at the edge.
Field strategy: angles, light, anticipation, and stabilization
Light is probably the single biggest limiting factor in slow-motion bird footage. You need a lot of it. Golden hour light (the hour after sunrise or before sunset) is beautiful but often too dim for high-frame-rate work without cranking ISO into noisy territory. The two to three hours after sunrise on a clear day are the practical sweet spot: light is still directional and warm but bright enough to use ISO 800 to 1600 at 120fps. Overcast skies give you soft, even light but tend to flatten detail in dark-colored birds like crows and starlings.
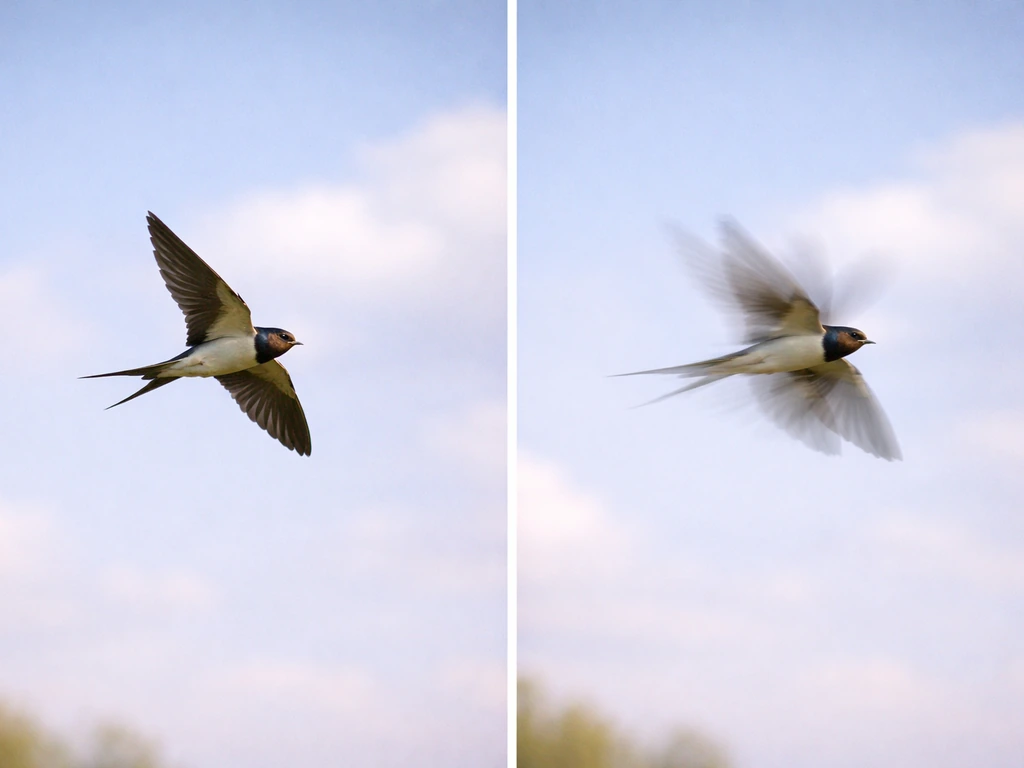
Angle relative to the bird makes a huge difference in what the slow motion reveals. A side-on shot (perpendicular to the bird's flight path) shows the full wing arc of both downstroke and upstroke, which is the most biomechanically informative view. A slightly below-and-front angle emphasizes the leading edge of the wing and the way the bird vectors thrust forward. Shooting directly into the sun behind the bird creates silhouette footage that can look spectacular but loses feather detail entirely.
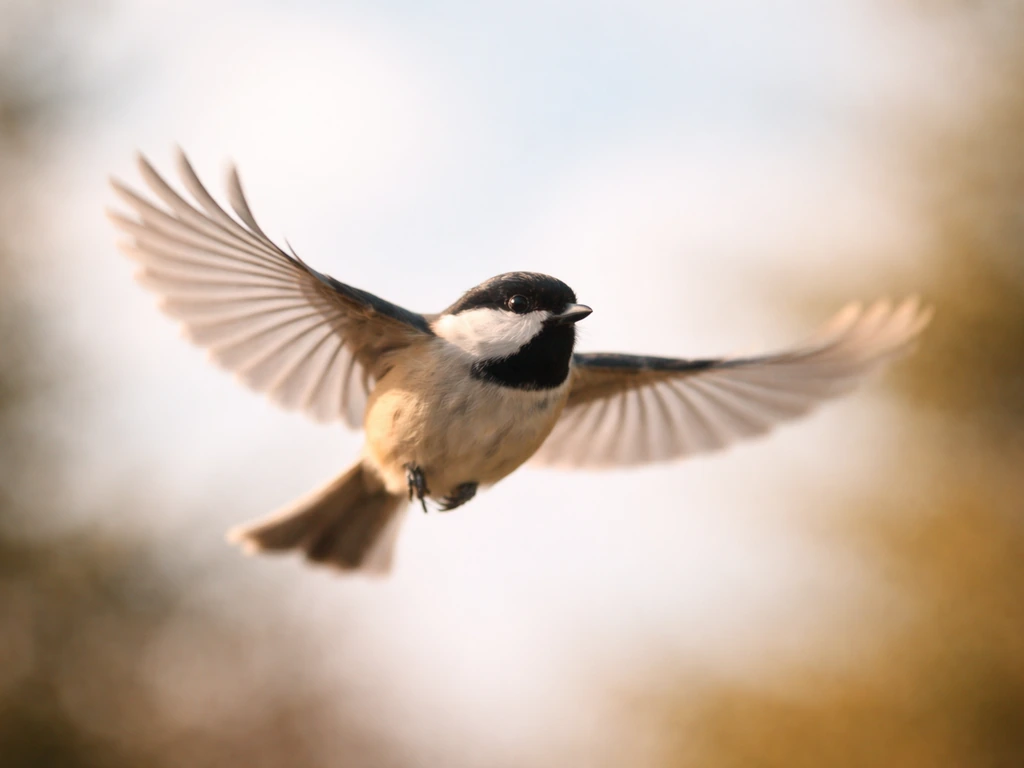
Anticipation is where most slow-motion sessions succeed or fail. Birds don't announce takeoffs, and your reaction time plus the camera's buffer fill time means you'll miss the first wingbeat if you wait to start recording. Bird takeoffs are especially noticeable in slow motion, since the first wingbeat and movement changes appear much more clearly. Learn your subject's pre-launch behavior: a heron rocks forward slightly before pushing off, a pigeon crouches and flicks its tail, a raptor on a perch often tilts its weight forward. Start recording at those cues, not when you see the wings open.
Stabilization matters more at slow motion than at normal speed because any camera shake is also slowed down and amplified. A monopod with a fluid tilt head gives you fast panning capability with good vertical stability. A full tripod with a fluid video head is more stable but limits how quickly you can swing to track a fast-moving bird. Optical image stabilization in the lens is useful but can sometimes fight against intentional panning; consider switching IS to panning mode (available on many telephoto lenses) which stabilizes vertical shake while allowing horizontal tracking movement.
- Shoot at least 2 hours after sunrise on clear days for the best combination of light and color temperature
- Position yourself with the sun at your back or at a 45-degree angle for maximum feather detail
- Use a monopod or fluid-head tripod for fast, stable panning
- Start recording on the bird's pre-launch behavioral cues, not after it's already airborne
- Keep a 300mm to 600mm telephoto lens; shorter lenses rarely fill the frame enough to reveal wing mechanics
What to actually watch for: bird-flight biomechanics in slow motion
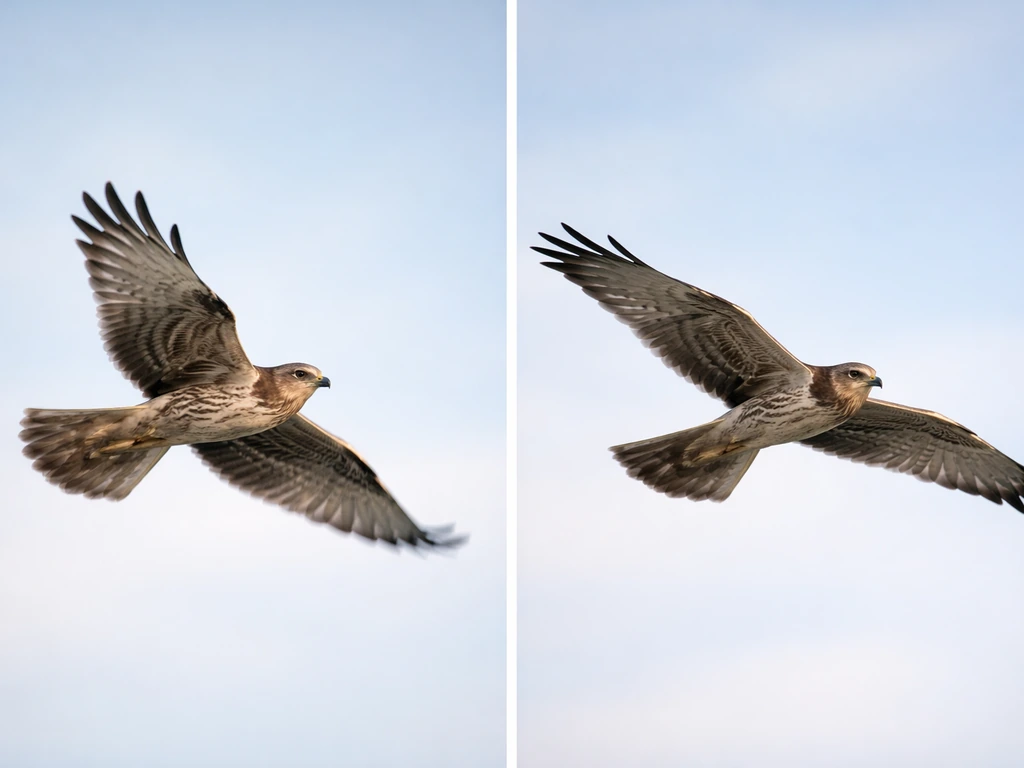
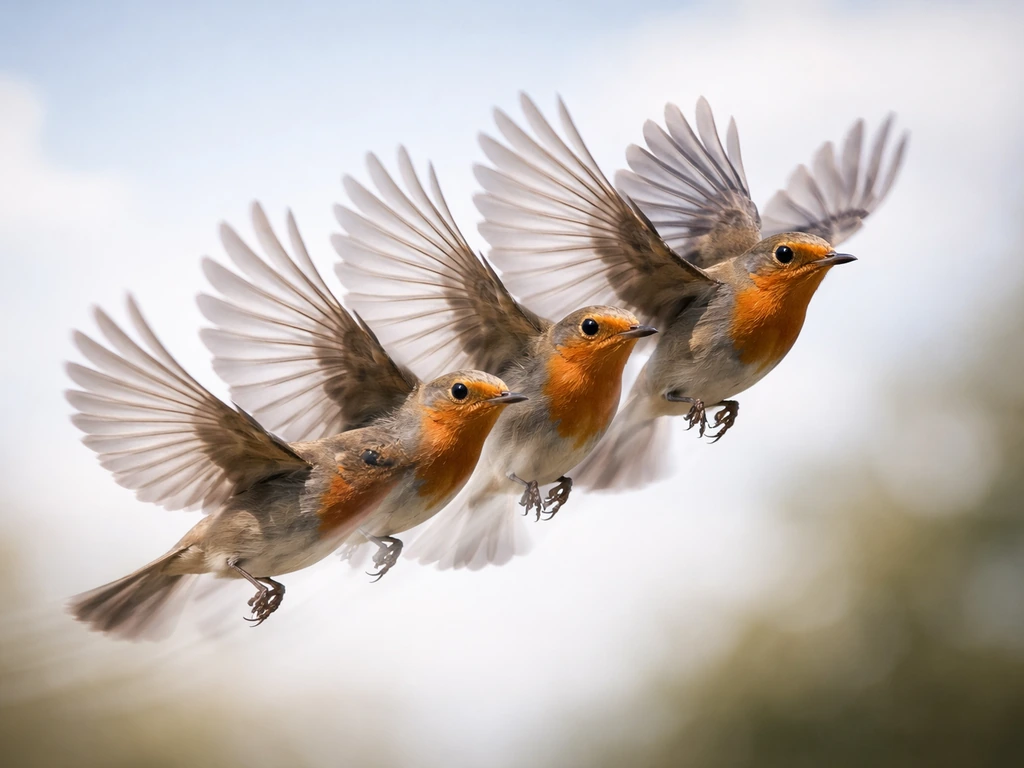
Slow motion turns a blur into a biology lesson. The two fundamental flight modes you'll see are flapping and gliding. During flapping flight, the downstroke is the power phase: the wing sweeps down and forward, generating lift and, when angled correctly, forward thrust. Research published in Nature Communications shows that during the first wingbeat of takeoff, the downstroke provides the bulk of the vertical acceleration, while upstroke lift contributes around a quarter of the forward thrust. In your footage, watch for the moment the wing transitions from downstroke to upstroke: you'll often see the primary feathers (the long outer flight feathers) separate and twist to reduce drag as the wing resets.
Gliding phases appear as long stretches where the wings are held mostly extended and still. The bird isn't generating thrust but is extracting energy from air currents or converting altitude into speed. Large soaring birds like red-tailed hawks and pelicans show this beautifully: slow motion reveals subtle adjustments in wing camber (the curve of the wing's cross-section) and wingtip angle that a normal-speed video completely misses. These are the aerodynamic control inputs that keep the bird stable in turbulent air.
Body posture is a third layer worth watching. A bird accelerating hard pulls its legs tight against its body to reduce drag. A bird preparing to land extends its feet forward and drops its tail to increase drag and shift its center of lift rearward. If you are specifically aiming for a slow motion bird landing, pay close attention to how the bird extends its feet forward and manages drag and lift at the moment of touchdown. Slow motion makes these postural shifts legible in a way that connects directly to the physics of lift and drag. If you're interested in the mechanics of specific moments like takeoff or landing, those phases have their own distinct biomechanical signatures worth exploring in detail.
Different species will show you different patterns. A hummingbird's wings move in a figure-eight stroke that generates lift on both the down and upstroke. A barn swallow's wing shape changes dramatically between the flap and the glide. A crow uses much more active wingbeat adjustment than a soaring raptor. The more species you film, the more obvious it becomes that there's no single "bird flight" but rather a family of solutions to the same aerodynamic problems.
Post-processing: smooth slow motion without killing your detail
The most important post decision is whether to use optical flow or frame blending to fill in your slow-down, or to just play back the original frames at a lower speed. If you shot 120fps and want to deliver at 24fps, you already have 5x the frames you need with no interpolation required. Simply interpreting the clip as 24fps in your editor (the "Interpret Footage" option in Premiere or the "Conform" setting in DaVinci Resolve) gives you clean, artifact-free slow motion. This is always the first choice.
blank" rel="noopener noreferrer">Frame interpolation (optical flow, Twixtor, or similar tools) creates synthetic intermediate frames by analyzing motion between existing ones. It can look impressive on smooth, predictable motion, but on fast wingbeats it tends to generate ghosting and smearing artifacts because the rapid, complex motion of wing feathers is hard for these algorithms to model accurately. Research from Disney on phase-based frame interpolation confirms that fast, hard-to-predict motion is exactly where blending artifacts appear. Use interpolation sparingly, and only when you need a slower result than your native frame rate allows.
Rolling shutter is another post concern. Most mirrorless cameras use CMOS sensors that scan the image line by line rather than capturing the whole frame at once. At high frame rates with fast-moving subjects, this can produce a "jello" wobble or skew distortion on wingtips moving through the frame quickly. Some cameras and post tools include rolling shutter correction (look for it in DaVinci Resolve's Inspector panel or Adobe Premiere's Distortion effects). It works reasonably well on mild cases, but severe rolling shutter on high-frequency wing motion is difficult to correct fully without smearing the image.
For color grading, bird plumage rewards careful highlight recovery. Birds like white egrets or ibises are easily blown out in bright conditions, and recovering that detail from a log or flat profile in post preserves the feather texture that makes slow-motion footage compelling. If your camera supports it, shoot in a log profile (S-Log on Sony, C-Log on Canon, N-Log on Nikon) and do your color work in post rather than relying on an in-camera picture profile.
Common problems and quick fixes
| Problem | Likely Cause | Fix |
|---|---|---|
| Blurry wings throughout clip | Shutter speed too slow for frame rate | Apply the 180-degree rule: shutter = 2x frame rate minimum |
| Wings sharp but clip looks stroby | Shutter too fast relative to frame rate | Lower shutter toward the 180-degree value for more natural blur |
| AF keeps losing the bird | Background complexity or bird too small in frame | Enable bird/animal subject recognition; try a wider tracking zone or step closer |
| Underexposed footage at high fps | Not enough light for the frame rate | Shoot in brighter conditions, raise ISO cap, or add a fast lens (f/2.8 or wider) |
| Frame drops or choppy playback | Buffer overflow or storage bottleneck | Use a faster card (CFexpress over UHS-II), reduce resolution, or shorten burst length |
| Jello/skew on wingtips | Rolling shutter artifact | Apply rolling shutter correction in post; use a gimbal or reduce camera movement during capture |
| Ghosting on feathers in slow-down | Frame interpolation applied to fast wing motion | Switch to native frame interpretation instead of optical flow |
One underrated fix for missed focus is repositioning yourself relative to the bird's flight path rather than changing camera settings. When a bird is flying toward you or directly away, the focus distance changes rapidly and even the best tracking systems struggle. A broadside shot, where the bird crosses in front of you at a consistent distance, is dramatically easier for continuous AF to hold. If you're at a regular shooting location, identify the lines where birds typically fly and set yourself up perpendicular to those paths.
Slow-motion bird footage rewards patience and preparation more than expensive gear. A Nikon Z9 with a 600mm prime is genuinely better than a smartphone, but a lot of compelling footage gets captured on mid-range mirrorless cameras by photographers who know their location, their bird species, and their settings before they arrive. Get the technical foundation right, watch for the biomechanical details that slow motion reveals, and you'll end up with footage that's as educational as it is beautiful. For a closer look at how bird flapping wings slow motion footage is created and what to watch in each wingbeat, review the techniques in the earlier gear and biomechanics sections slow-motion footage.
FAQ
What if my camera only shoots 60fps, how can I still get “slow mo bird flying” that looks good?
You can still get usable results by slowing to 24fps (half or less of the original rate) and prioritizing subject distance, exposure, and tracking stability. Focus on crisp acquisition first, then reduce the timeline speed gradually in your editor so feather motion does not turn into blur that looks “mushy” rather than smooth.
Do I need to shoot 4K for slow mo bird flying, or is 1080p fine?
1080p can work well if you plan minimal cropping, but 4K gives more flexibility when you need to punch in 50 to 70 percent to reframe the bird. If your camera drops bitrate or uses a heavy crop at high frame rates, check the actual sensor crop and output resolution you will deliver before you commit in the field.
Should I prioritize image stabilization on or off while filming birds in flight?
Use a telephoto’s stabilization in a way that matches your panning style. If you are making deliberate horizontal pans, consider switching IS to a panning mode (stabilizing vertical shake). If you are on a tripod with a fluid head, you may prefer IS off to reduce any micro-corrections that fight your movement.
How do I avoid jittery slow motion even when my footage looks “smooth” on playback?
Jitter often comes from inconsistent panning and exposure-driven noise rather than the frame rate itself. Use a monopod or stable stance, keep the bird’s speed in mind so you pan smoothly through its bank, and expose to protect highlights on bright birds so your grading does not amplify noise in darker wing shadows.
What’s the best shutter strategy if I want both smooth motion and sharp feathers?
Start with the 180-degree rule (about double the frame rate). If the feather edges still look soft, test a faster shutter like 1/500 to 1/1000 at 120fps, then compare side-by-side clips to judge whether you prefer smoother blur or crisper feather separation. Expect that faster shutters will demand higher ISO or more light.
My bird recognition locks onto the wrong thing sometimes, what should I check first?
First, check framing and scale. Eye detection is more likely to fail if the bird occupies a small portion of the frame or blends into complex backgrounds. If you see repeated focus hunting on certain angles, reposition for a clearer contrast background and increase tracking responsiveness so the system reacts quicker to direction changes.
Is it better to record longer clips or shorter bursts for slow mo bird flying?
Short bursts are usually better because buffer limits and overheating or light changes can hurt consistency across a long clip. Practice starting to record early based on pre-launch cues, but stop and re-aim frequently so you do not spend high-frame-rate time on empty sky or on a bird that will veer behind obstacles.
How do I handle the “jello” rolling shutter effect in post?
Rolling shutter is limited at capture time, so post fixes are mostly partial. Try recording with the least aggressive rolling shutter mode your camera offers (some modes reduce scan speed), keep the bird side-on to reduce skew, and apply rolling shutter correction only when distortion is mild, because heavy correction can smear fast feather motion.
What should I do about motion blur from my own movement, not the bird’s?
Keep your body rotation smooth and driven by hips and shoulders rather than wrist-only panning. Track the bird with your whole upper body and anticipate its bank so you do not “catch up” late. If your lens has a panning IS mode, use it, and consider a faster grip or harness for steadier telephoto control.
When is frame interpolation actually worth it for slow mo bird flying?
Interpolation can be worth it if you need a specific delivery frame rate and your source motion is relatively predictable, but wingbeats often produce ghosting. Use it only if you cannot deliver at a native rate you captured (for example, if you must go slower than your recorded fps), and verify with short tests on wingbeats before processing your full set.
How can I improve results when the bird is flying toward me or away from me?
Those angles change distance rapidly, which makes tracking harder. If possible, reposition to get a more broadside crossing path, and shoot with the bird’s travel direction stable relative to your lens. If you must shoot head-on, increase tracking responsiveness and consider prioritizing the bird body or nearest reliable focus target rather than expecting perfect eye lock.
Any quick lighting tactic to keep ISO reasonable at high frame rates?
Look for bright, consistent conditions in the 2 to 3 hours after sunrise, or choose open shade with even illumination for overcast-like softness without extreme dimness. If you are in bright sun, use your exposure settings to protect highlights so feather texture survives grading, which reduces the need for aggressive noise reduction later.
Next Article
Bird Flying in Slow Motion: How to Capture and Make GIFs
Capture or make a bird flying in slow motion GIF with smart gear settings, tracking tips, and biology-based flight motio